实用!纯CSS3实现的内容选项卡(Content Tabs)4个实例
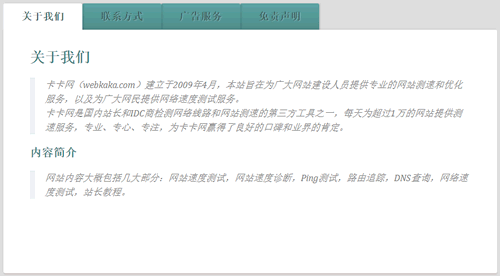
作者:admin 时间:2020-8-1 16:8:44 浏览:之前我做内容选项卡(Content Tabs)的时候,会用到一些小图片来区隔,那样虽然能达到理想的效果,但是维护起来却不太容易,因为需要更改图片。今天我将介绍用纯CSS3实现的内容选项卡(Content Tabs)4个实例,在本教程中,我们将使用单选按钮以及:checked伪类和同级组合器来实现一些简单的CSS3内容选项卡,效果很好,非常实用,值得收藏。

纯CSS3实现的内容选项卡(Content Tabs)
内容选项卡是Web设计中非常常见且熟悉的元素,通常它们非常有用。
实例一

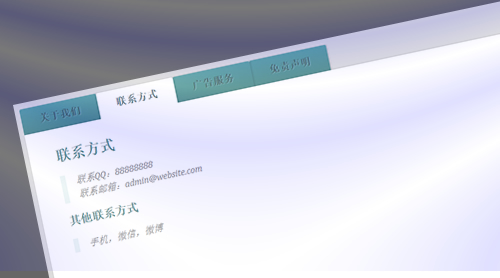
实例二

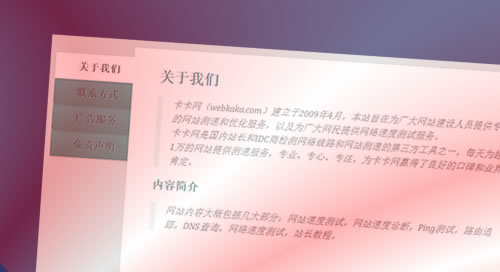
实例三

实例四

标记
我们将使用input元素连接具有类内容(class content)的分隔。内容分隔包括所有“标签页(tab pages)”。对于每个input元素,我们将有一个label元素。所有标签的样式将类似于标签。
<section class="tabs">
  <input id="tab-1" type="radio" name="radio-set" class="tab-selector-1" checked="checked" />
  <label for="tab-1" class="tab-label-1">关于我们</label>
  <input id="tab-2" type="radio" name="radio-set" class="tab-selector-2" />
  <label for="tab-2" class="tab-label-2">联系方式</label>
  <input id="tab-3" type="radio" name="radio-set" class="tab-selector-3" />
  <label for="tab-3" class="tab-label-3">广告服务</label>
  <input id="tab-4" type="radio" name="radio-set" class="tab-selector-4" />
  <label for="tab-4" class="tab-label-4">免责声明</label>

  <div class="clear-shadow"></div>
  <div class="content">
    <div class="content-1">
            <p>Some content</p>
    </div>
    <div class="content-2">
            <p>Some content</p>
    </div>
    <div class="content-3">
            <p>Some content</p>
    </div>
    <div class="content-4">
            <p>Some content</p>
    </div>
  </div>
</section>
每个input元素都有一个值,我们可以通过添加checked的属性来使input默认为选中状态。
CSS
我们需要做的第一件事是定义一些尺寸并通过将input的不透明度设置为0来隐藏它们:
tabs {
  position: relative;
  margin: 40px auto;
  width: 750px;
}

.tabs input {
  position: absolute;
  z-index: 1000;
  width: 120px;
  height: 40px;
  left: 0px;
  top: 0px;
  opacity: 0;
  cursor: pointer;
}
.tabs input#tab-2{
  left: 120px;
}
.tabs input#tab-3{
  left: 240px;
}
.tabs input#tab-4{
  left: 360px;
}input将覆盖label,看起来好像我们单击了标签(label),但实际上我们正在单击输入(input),这是一个技巧,也可以在移动浏览器中使用。
接下来,通过为标签(label)定义一些整洁的样式,使标签看起来像标签。请注意,每个标签都有不同的z-index。盒子阴影将为选项卡增加深度和真实感。
.tabs label {
  background: linear-gradient(top, #5ba4a4 0%,#4e8c8a 100%);
  font-size: 15px;
  line-height: 40px;
  height: 40px;
  position: relative;
  padding: 0 20px;
  float: left;
  display: block;
  width: 80px;
  color: #385c5b;
  letter-spacing: 1px;
  text-transform: uppercase;
  font-weight: bold;
  text-align: center;
  text-shadow: 1px 1px 1px rgba(255,255,255,0.3);
  border-radius: 3px 3px 0 0;
  box-shadow: 2px 0 2px rgba(0,0,0,0.1), -2px 0 2px rgba(0,0,0,0.1);
}

.tabs input:hover + label {
  background: #5ba4a4;
}

.tabs label:first-of-type {
  z-index: 4;
  box-shadow: 2px 0 2px rgba(0,0,0,0.1);
}

.tab-label-2 {
  z-index: 3;
}

.tab-label-3 {
  z-index: 2;
}

.tab-label-4 {
  z-index: 1;
}由于我们不希望显示框阴影的底部,因此我们将使用:after伪元素将其覆盖,其中不包含任何内容:
.tabs label:after {
  content: '';
  background: #fff;
  position: absolute;
  bottom: -2px;
  left: 0;
  width: 100%;
  height: 2px;
  display: block;
}当我们单击一个选项卡(label)时,它的样式和颜色将与其他样式不同,重要的是要确保“已选中(checked)”标签将位于选项卡中所有其他层的顶部。因此,我们将为其赋予最高的z-index:
.tabs input:checked + label {
  background: #fff;
  z-index: 6;
}如前所述,内容分区将包含所有标签页,我们将其z-index设置为5,使其在所选标签下。这样,内容区域的盒子阴影将覆盖所有其他标签。
在内容区域内,有四个分区,每个分区都有自己的内容。默认情况下(当未选择/单击它们各自的标签时),我们希望它们被隐藏。因此,我们将不透明度设置为零,将z-index设置为1。我们不能使用display:none属性,因为transitions不支持该属性。
.content {
  background: #fff;
  position: relative;
  width: 100%;
  height: 370px;
  z-index: 5;
  box-shadow: 0 -2px 3px -2px rgba(0,0,0,0.2), 0 2px 2px rgba(0,0,0,0.1);
  border-radius: 0 3px 3px 3px;
}

.content div {
  position: absolute;
  top: 0;
  left: 0;
  padding: 10px 40px;
  z-index: 1;
  opacity: 0;
  transition: all linear 0.1s;
}

.content div h2,
.content div h3{
  color: #398080;
}
.content div p {
  font-size: 14px;
  line-height: 22px;
  font-style: italic;
  text-align: left;
  margin: 0;
  color: #777;
  padding-left: 15px;
  font-family: Cambria, Georgia, serif;
  border-left: 8px solid rgba(63,148,148, 0.1);
}当我们希望某个内容出现(单击标签)时,我们将不透明度设置为1并提高z-index,因为我们希望该内容划分位于所有其他内容之上:
.tabs input.tab-selector-1:checked ~ .content .content-1,
.tabs input.tab-selector-2:checked ~ .content .content-2,
.tabs input.tab-selector-3:checked ~ .content .content-3,
.tabs input.tab-selector-4:checked ~ .content .content-4 {
  z-index: 100;
  opacity: 1;
  transition: all ease-out 0.2s 0.1s;
}
在本教程中,介绍了将内容淡入/淡出的基本示例。您可以在演示中找到更多样式和效果。


