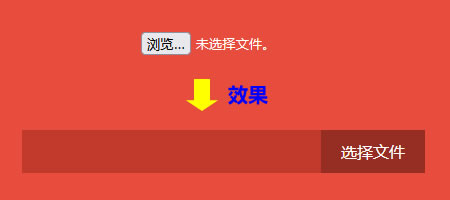
漂亮的文件上传按钮CSS样式设计
作者:admin 时间:2021-8-9 10:17:40 浏览:文件上传按钮默认无样式,现在应该没有网页或UI设计人员会用默认的按钮了。其实我们完全可以自己设计一个文件上传按钮,使用CSS设计布局和排版样式,巧妙地运用jQuery加以配合,就能实现。
下图就显示了默认和自定义的文件上传按钮样式的巨大变化。

漂亮的文件上传按钮CSS样式设计
本文就介绍如何实现上图的文件上传按钮。
实例介绍
本实例的文件上传按钮需要用到jQuery,因此要引用jQuery库文件。
点击“选择文件”弹出对话框,选择文件后,文件名出现在输入框中。
完整HTML文件
<!DOCTYPE html>
<html>
<head>
  <meta charset="UTF-8">
  <title>Css FIle Upload</title>

<style>

* {
  margin: 0;
  padding: 0;
  font-family: 微软雅黑;
  -moz-box-sizing: border-box;
  -webkit-box-sizing: border-box;
  box-sizing: border-box;
}

body {
  color: #fff;
  padding: 55px 25px;
  background-color: #e74c3c;
}

h1 {
  font-weight: normal;
  font-size: 40px;
  font-weight: normal;
  text-transform: uppercase;
}
h1 span {
  font-size: 13px;
  display: block;
  padding-left: 4px;
}

p {
  margin-top: 200px;
}
p a {
  text-transform: uppercase;
  text-decoration: none;
  display: inline-block;
  color: #fff;
  padding: 5px 10px;
  margin: 0 5px;
  background-color: #b83729;
  -moz-transition: all 0.2s ease-in;
  -o-transition: all 0.2s ease-in;
  -webkit-transition: all 0.2s ease-in;
  transition: all 0.2s ease-in;
}
p a:hover {
  background-color: #ab3326;
}

.custom-file-upload-hidden {
  display: none;
  visibility: hidden;
  position: absolute;
  left: -9999px;
}

.custom-file-upload {
  display: block;
  width: auto;
  font-size: 16px;
  margin-top: 30px;
}
.custom-file-upload label {
  display: block;
  margin-bottom: 5px;
}

.file-upload-wrapper {
  position: relative;
  margin-bottom: 5px;
}

.file-upload-input {
  width: 300px;
  color: #fff;
  font-size: 16px;
  padding: 11px 17px;
  border: none;
  background-color: #c0392b;
  -moz-transition: all 0.2s ease-in;
  -o-transition: all 0.2s ease-in;
  -webkit-transition: all 0.2s ease-in;
  transition: all 0.2s ease-in;
  float: left;
  /* IE 9 Fix */
}
.file-upload-input:hover, .file-upload-input:focus {
  background-color: #ab3326;
  outline: none;
}

.file-upload-button {
  cursor: pointer;
  display: inline-block;
  color: #fff;
  font-size: 16px;
  text-transform: uppercase;
  padding: 11px 20px;
  border: none;
  margin-left: -1px;
  background-color: #962d22;
  float: left;
  /* IE 9 Fix */
  -moz-transition: all 0.2s ease-in;
  -o-transition: all 0.2s ease-in;
  -webkit-transition: all 0.2s ease-in;
  transition: all 0.2s ease-in;
}
.file-upload-button:hover {
  background-color: #6d2018;
}
</style>

</head>

<body translate="no" >
  <h1>文件上传</h1>
<div class="custom-file-upload">
    <!--<label for="file">File: </label>-->
    <input type="file" id="file" name="myfiles[]" multiple />
</div>


  <script src='jquery-3.2.1.min.js'></script>
      <script id="rendered-js" >
//Reference:
//https://www.onextrapixel.com/2012/12/10/how-to-create-a-custom-file-input-with-jquery-css3-and-php/
;(function ($) {

  // Browser supports HTML5 multiple file?
  var multipleSupport = typeof $('<input/>')[0].multiple !== 'undefined',
  isIE = /msie/i.test(navigator.userAgent);

  $.fn.customFile = function () {

    return this.each(function () {

      var $file = $(this).addClass('custom-file-upload-hidden'), // the original file input
      $wrap = $('<div class="file-upload-wrapper">'),
      $input = $('<input type="text" class="file-upload-input" />'),
      // Button that will be used in non-IE browsers
      $button = $('<button type="button" class="file-upload-button">选择文件</button>'),
      // Hack for IE
      $label = $('<label class="file-upload-button" for="' + $file[0].id + '">选择文件</label>');

      // Hide by shifting to the left so we
      // can still trigger events
      $file.css({
        position: 'absolute',
        left: '-9999px' });


      $wrap.insertAfter($file).
      append($file, $input, isIE ? $label : $button);

      // Prevent focus
      $file.attr('tabIndex', -1);
      $button.attr('tabIndex', -1);

      $button.click(function () {
        $file.focus().click(); // Open dialog
      });

      $file.change(function () {

        var files = [],fileArr,filename;

        // If multiple is supported then extract
        // all filenames from the file array
        if (multipleSupport) {
          fileArr = $file[0].files;
          for (var i = 0, len = fileArr.length; i < len; i++) {
            files.push(fileArr[i].name);
          }
          filename = files.join(', ');

          // If not supported then just take the value
          // and remove the path to just show the filename
        } else {
          filename = $file.val().split('\\').pop();
        }

        $input.val(filename) // Set the value
        .attr('title', filename) // Show filename in title tootlip
        .focus(); // Regain focus

      });

      $input.on({
        blur: function () {$file.trigger('blur');},
        keydown: function (e) {
          if (e.which === 13) {// Enter
            if (!isIE) {$file.trigger('click');}
          } else if (e.which === 8 || e.which === 46) {// Backspace & Del
            // On some browsers the value is read-only
            // with this trick we remove the old input and add
            // a clean clone with all the original events attached
            $file.replaceWith($file = $file.clone(true));
            $file.trigger('change');
            $input.val('');
          } else if (e.which === 9) {// TAB
            return;
          } else {// All other keys
            return false;
          }
        } });


    });

  };

  // Old browser fallback
  if (!multipleSupport) {
    $(document).on('change', 'input.customfile', function () {

      var $this = $(this),
      // Create a unique ID so we
      // can attach the label to the input
      uniqId = 'customfile_' + new Date().getTime(),
      $wrap = $this.parent(),

      // Filter empty input
      $inputs = $wrap.siblings().find('.file-upload-input').
      filter(function () {return !this.value;}),

      $file = $('<input type="file" id="' + uniqId + '" name="' + $this.attr('name') + '"/>');

      // 1ms timeout so it runs after all other events
      // that modify the value have triggered
      setTimeout(function () {
        // Add a new input
        if ($this.val()) {
          // Check for empty fields to prevent
          // creating new inputs when changing files
          if (!$inputs.length) {
            $wrap.after($file);
            $file.customFile();
          }
          // Remove and reorganize inputs
        } else {
          $inputs.parent().remove();
          // Move the input so it's always last on the list
          $wrap.appendTo($wrap.parent());
          $wrap.find('input').focus();
        }
      }, 1);

    });
  }

})(jQuery);

$('input[type=file]').customFile();
//# sourceURL=pen.js
    </script>


</body>

</html>
代码解释
CSS的transition属性可设置鼠标移到按钮上时,按钮颜色动画变化效果。
CSS的background-color属性可设置按钮颜色。
HTML代码需要引用jQuery库文件,你可以引用百度等第三方提供的公共库文件。
<script src='jquery-3.2.1.min.js'></script>
代码已兼容各主流浏览器,包括IE。
相关文章
x


