带裁剪功能的HTML5图片上传程序
作者:admin 时间:2021-7-28 9:27:47 浏览:在上一篇文章里,介绍了《纯HTML5上传图片文件(带进度条和预览)》,本文介绍的HTML5图片上传程序,是有裁剪功能的,即是只上传裁剪的部分,而不是上传整张图片。
在开始之前,先介绍一下程序的运行过程。
3 步过程:选择文件 -> 裁剪 -> 上传。
在选择文件时,我们会检查文件类型和大小(以避免文件过大)。当上传了裁剪后的图像时,我们将接受(上传)这个文件到我们的网站(到某个文件夹)。请注意,处理图像需要 GD 库。
带裁剪功能的HTML5图片上传程序
步骤 1. HTML
我们的第一步是 html 标记。首先,我们必须将样式和脚本放在 HEAD 部分:
<!-- add styles -->
<link href="css/main.css" rel="stylesheet" type="text/css" />
<link href="css/jquery.Jcrop.min.css" rel="stylesheet" type="text/css" />
<!-- add scripts -->
<script src="js/jquery.min.js"></script>
<script src="js/jquery.Jcrop.min.js"></script>
<script src="js/script.js"></script>
现在,在 BODY 部分,我们可以放置表单:
<div class="bbody">
<!-- upload form -->
<form id="upload_form" enctype="multipart/form-data" method="post" action="upload.php" onsubmit="return checkForm()">
<!-- hidden crop params -->
<input type="hidden" id="x1" name="x1" />
<input type="hidden" id="y1" name="y1" />
<input type="hidden" id="x2" name="x2" />
<input type="hidden" id="y2" name="y2" />
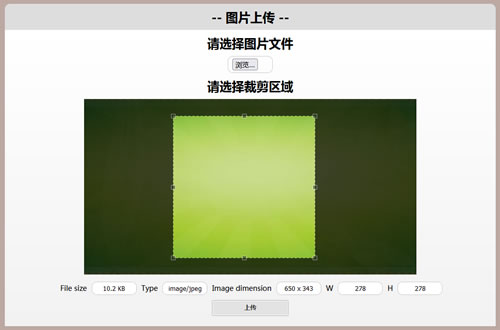
<h2>Step1: Please select image file</h2>
<div><input type="file" name="image_file" id="image_file" onchange="fileSelectHandler()" /></div>
<div class="error"></div>
<div class="step2">
<h2>Step2: Please select a crop region</h2>
<img id="preview" />
<div class="info">
<label>File size</label> <input type="text" id="filesize" name="filesize" />
<label>Type</label> <input type="text" id="filetype" name="filetype" />
<label>Image dimension</label> <input type="text" id="filedim" name="filedim" />
<label>W</label> <input type="text" id="w" name="w" />
<label>H</label> <input type="text" id="h" name="h" />
</div>
<input type="submit" value="Upload" />
</div>
</form>
</div>
这是通常的上传表单,带有隐藏和可见字段。
第 2 步. CSS
现在,CSS 样式风格化表单。
css/main.css
.bheader {
    background-color: #DDDDDD;
    border-radius: 10px 10px 0 0;
    padding: 10px 0;
    text-align: center;
}
.bbody {
    color: #000;
    overflow: hidden;
    padding-bottom: 20px;
    text-align: center;
    background: -moz-linear-gradient(#ffffff, #f2f2f2);
    background: -ms-linear-gradient(#ffffff, #f2f2f2);
    background: -webkit-gradient(linear, left top, left bottom, color-stop(0%, #ffffff), color-stop(100%, #f2f2f2));
    background: -webkit-linear-gradient(#ffffff, #f2f2f2);
    background: -o-linear-gradient(#ffffff, #f2f2f2);
    filter: progid:DXImageTransform.Microsoft.gradient(startColorstr='#ffffff', endColorstr='#f2f2f2');
    -ms-filter: "progid:DXImageTransform.Microsoft.gradient(startColorstr='#ffffff', endColorstr='#f2f2f2')";
    background: linear-gradient(#ffffff, #f2f2f2);
}
.bbody h2, .info, .error {
    margin: 10px 0;
}
.step2, .error {
    display: none;
}
.error {
    font-size: 18px;
    font-weight: bold;
    color: red;
}
.info {
    font-size: 14px;
}
label {
    margin: 0 5px;
}
input {
    border: 1px solid #CCCCCC;
    border-radius: 10px;
    padding: 4px 8px;
    text-align: center;
    width: 70px;
}
.jcrop-holder {
    display: inline-block;
}
input[type=submit] {
    background: #e3e3e3;
    border: 1px solid #bbb;
    border-radius: 3px;
    -webkit-box-shadow: inset 0 0 1px 1px #f6f6f6;
    box-shadow: inset 0 0 1px 1px #f6f6f6;
    color: #333;
    font: bold 12px/1 "helvetica neue", helvetica, arial, sans-serif;
    padding: 8px 0 9px;
    text-align: center;
    text-shadow: 0 1px 0 #fff;
    width: 150px;
}
input[type=submit]:hover {
    background: #d9d9d9;
    -webkit-box-shadow: inset 0 0 1px 1px #eaeaea;
    box-shadow: inset 0 0 1px 1px #eaeaea;
    color: #222;
    cursor: pointer;
}
input[type=submit]:active {
    background: #d0d0d0;
    -webkit-box-shadow: inset 0 0 1px 1px #e3e3e3;
    box-shadow: inset 0 0 1px 1px #e3e3e3;
    color: #000;
}
步骤 3. JS
以下是javascript实现代码。
js/script.js
// convert bytes into friendly format
function bytesToSize(bytes) {
    var sizes = ['Bytes', 'KB', 'MB'];
    if (bytes == 0) return 'n/a';
    var i = parseInt(Math.floor(Math.log(bytes) / Math.log(1024)));
    return (bytes / Math.pow(1024, i)).toFixed(1) + ' ' + sizes[i];
};
// check for selected crop region
function checkForm() {
    if (parseInt($('#w').val())) return true;
    $('.error').html('Please select a crop region and then press Upload').show();
    return false;
};
// update info by cropping (onChange and onSelect events handler)
function updateInfo(e) {
    $('#x1').val(e.x);
    $('#y1').val(e.y);
    $('#x2').val(e.x2);
    $('#y2').val(e.y2);
    $('#w').val(e.w);
    $('#h').val(e.h);
};
// clear info by cropping (onRelease event handler)
function clearInfo() {
    $('.info #w').val('');
    $('.info #h').val('');
};
// Create variables (in this scope) to hold the Jcrop API and image size
var jcrop_api, boundx, boundy;
function fileSelectHandler() {
    // get selected file
    var oFile = $('#image_file')[0].files[0];
    // hide all errors
    $('.error').hide();
    // check for image type (jpg and png are allowed)
    var rFilter = /^(image\/jpeg|image\/png)$/i;
    if (! rFilter.test(oFile.type)) {
        $('.error').html('Please select a valid image file (jpg and png are allowed)').show();
        return;
    }
    // check for file size
    if (oFile.size > 250 * 1024) {
        $('.error').html('You have selected too big file, please select a one smaller image file').show();
        return;
    }
    // preview element
    var oImage = document.getElementById('preview');
    // prepare HTML5 FileReader
    var oReader = new FileReader();
        oReader.onload = function(e) {
        // e.target.result contains the DataURL which we can use as a source of the image
        oImage.src = e.target.result;
        oImage.onload = function () { // onload event handler
            // display step 2
            $('.step2').fadeIn(500);
            // display some basic image info
            var sResultFileSize = bytesToSize(oFile.size);
            $('#filesize').val(sResultFileSize);
            $('#filetype').val(oFile.type);
            $('#filedim').val(oImage.naturalWidth + ' x ' + oImage.naturalHeight);
            // destroy Jcrop if it is existed
            if (typeof jcrop_api != 'undefined') {
                jcrop_api.destroy();
                jcrop_api = null;
                $('#preview').width(oImage.naturalWidth);
                $('#preview').height(oImage.naturalHeight);
            }
            setTimeout(function(){
                // initialize Jcrop
                $('#preview').Jcrop({
                    minSize: [32, 32], // min crop size
                    aspectRatio : 1, // keep aspect ratio 1:1
                    bgFade: true, // use fade effect
                    bgOpacity: .3, // fade opacity
                    onChange: updateInfo,
                    onSelect: updateInfo,
                    onRelease: clearInfo
                }, function(){
                    // use the Jcrop API to get the real image size
                    var bounds = this.getBounds();
                    boundx = bounds[0];
                    boundy = bounds[1];
                    // Store the Jcrop API in the jcrop_api variable
                    jcrop_api = this;
                });
            },3000);
        };
    };
    // read selected file as DataURL
    oReader.readAsDataURL(oFile);
}
开头有几个常用函数:bytesToSize、checkForm、updateInfo和clearInfo。它们很简单。接下来的函数(fileSelectHandler)比较复杂,基本上就是这个main函数了。当我们选择了一个文件(图像文件)后,我们将检查这个文件的类型和大小。你可以在这里看到图像格式的过滤器:png 和 jpg。另外,我们不需要非常大的图像,我认为 250kb 已经足够了。然后,如果一切正常,我们可以使用 FileReader::readAsDataURL(html5 函数)读取我们选择的文件。而且,一旦它加载完毕,我们就可以继续,我们应该显示带有预览和信息部分,然后,我们必须为我们的预览图像初始化。这就是它的工作原理。裁剪图像后,我们可以单击“上传”按钮以将结果发送到服务器。
第 4 步. PHP
在这一步中,我们必须接受(并上传)我们裁剪出来的图片。下面是一个有用的 PHP 函数:
function uploadImageFile() { // Note: GD library is required for this function
    if ($_SERVER['REQUEST_METHOD'] == 'POST') {
        $iWidth = $iHeight = 200; // desired image result dimensions
        $iJpgQuality = 90;
        if ($_FILES) {
            // if no errors and size less than 250kb
            if (! $_FILES['image_file']['error'] && $_FILES['image_file']['size'] < 250 * 1024) {
                if (is_uploaded_file($_FILES['image_file']['tmp_name'])) {
                    // new unique filename
                    $sTempFileName = 'cache/' . md5(time().rand());
                    // move uploaded file into cache folder
                    move_uploaded_file($_FILES['image_file']['tmp_name'], $sTempFileName);
                    // change file permission to 644
                    @chmod($sTempFileName, 0644);
                    if (file_exists($sTempFileName) && filesize($sTempFileName) > 0) {
                        $aSize = getimagesize($sTempFileName); // try to obtain image info
                        if (!$aSize) {
                            @unlink($sTempFileName);
                            return;
                        }
                        // check for image type
                        switch($aSize[2]) {
                            case IMAGETYPE_JPEG:
                                $sExt = '.jpg';
                                // create a new image from file
                                $vImg = @imagecreatefromjpeg($sTempFileName);
                                break;
                            case IMAGETYPE_PNG:
                                $sExt = '.png';
                                // create a new image from file
                                $vImg = @imagecreatefrompng($sTempFileName);
                                break;
                            default:
                                @unlink($sTempFileName);
                                return;
                        }
                        // create a new true color image
                        $vDstImg = @imagecreatetruecolor( $iWidth, $iHeight );
                        // copy and resize part of an image with resampling
                        imagecopyresampled($vDstImg, $vImg, 0, 0, (int)$_POST['x1'], (int)$_POST['y1'], $iWidth, $iHeight, (int)$_POST['w'], (int)$_POST['h']);
                        // define a result image filename
                        $sResultFileName = $sTempFileName . $sExt;
                        // output image to file
                        imagejpeg($vDstImg, $sResultFileName, $iJpgQuality);
                        @unlink($sTempFileName);
                        return $sResultFileName;
                    }
                }
            }
        }
    }
}
$sImage = uploadImageFile();
echo '<img src="'.$sImage.'" />';
我们也必须在服务器端检查图像大小和格式,结果,我们将获得双重保护(在用户端和服务器端)免受不需要的文件被上传。一旦我们上传了图像(使用 move_uploaded_file),我们可以裁剪它(使用 GD 的函数:imagecreatefromjpeg、imagecreatetruecolor 和 imagecopyresampled),并且——使用“imagejpeg”函数将结果转换为图像文件。请注意,在结果中我们会得到一个小图像(只有 200×200),因此,除了裁剪之外,我们还调整了图像的大小。我为所有传入的照片选择了一个所需的尺寸:200×200(这是一个很好的格式,例如..个人资料的头像)。最后,我们可以在屏幕上显示这个图像。
您可能对以下文章也感兴趣