CSS+js实现图片淡入淡出幻灯片轮播效果
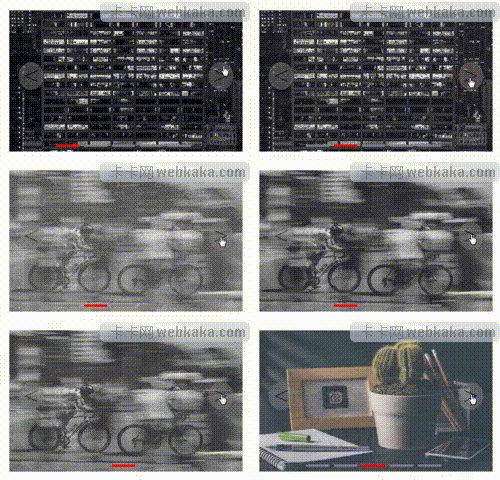
作者:admin 时间:2022-3-14 14:47:39 浏览:本文介绍一个CSS+js实现的图片淡入淡出轮播效果的幻灯片实例,可点击或自动轮播。

功能介绍
- 自动切换轮播效果
- 鼠标移上轮播停止
- 鼠标移开轮播继续
- 可向左或向右切换
- 可点击小横条切换
HTML
<div>
    <ul>
        <li><img src="1.jpg" alt=""></li>
        <li><img src="2.jpg" alt=""></li>
        <li><img src="3.jpg" alt=""></li>
        <li><img src="4.jpg" alt=""></li>
        <li><img src="5.jpg" alt=""></li>
    </ul>
    <span class="left"> < </span>
    <span class="right"> > </span>
    <a></a>
    <a></a>
    <a></a>
    <a></a>
    <a></a>
</div>
div标签是轮播区域盒子,在CSS中定义其位置、高度、宽度等样式。
ul li列表标签是轮播的图片。
两个span标签是向左和向右的箭头,其作用是当鼠标点击它可向左或向右切换图片。
5个a标签,是轮播底部的5个小横条。点击小横条可切换图片。
CSS
div {
    margin: 100 px auto;
    width: 500 px;
    height: 300 px;
    position: relative;
}
ul {
    position: relative;
}
li {
    list - style: none;
    position: absolute;
    opacity: 0;
    transition - duration: 3 s;
}
li: first - child {
    opacity: 1;
}
img {
    width: 500 px;
    height: 300 px;
}
div: hover span {
    display: block;
}
span {
    position: absolute;
    font - size: 50 px;
    cursor: pointer;
    display: none;
    background - color: grey;
    border - radius: 50 % ;
    opacity: 0.5;
}
span: first - of - type {
    left: 20 px;
    top: 110 px;
}
span: last - of - type {
    right: 20 px;
    top: 110 px;
}
a {
    position: absolute;
    width: 50 px;
    height: 5 px;
    background - color: grey;
    cursor: pointer;
}
a: first - of - type {
    bottom: 10 px;
    left: 100 px;
    background - color: red;
}
a: nth - of - type(2) {
    bottom: 10 px;
    left: 160 px;
}
a: nth - of - type(3) {
    bottom: 10 px;
    left: 220 px;
}
a: nth - of - type(4) {
    bottom: 10 px;
    left: 280 px;
}
a: nth - of - type(5) {
    bottom: 10 px;
    left: 340 px;
}div是轮播区域盒子,CSS定义其位置、高度、宽度等样式。
li是定义轮播图片的列表样式。
span定义向左向右箭头的样式。
a定义底部小横条的样式。
a:nth-of-type(n) n值为2-4,是定义5张图片的位置。如果你的轮播图片多于5张,可以参考实例加多n个a:nth-of-type(n),需要注意的是left属性值的递增数值是60。
JS
let num = 0;
let timer;

function AddTimer(num) {
    timer = setInterval(() => {
        ChangePic(num);
        num++;
        if(num == 5) {
            num = 0;
        }
    }, 3000);
}

function ChangePic(num) {
    for(let i of document.querySelectorAll("li")) {
        i.style.opacity = "0";
    }
    toRed(num);
    document.querySelectorAll("li")[num].style.opacity = "1";
}

function toRed(num) {
    for(let i of document.querySelectorAll("a")) {
        i.style.backgroundColor = "grey";
    }
    document.querySelectorAll("a")[num].style.backgroundColor = "red";
}
AddTimer(num);
// 小圆点
for(let i = 0; i < document.querySelectorAll("a").length; i++) {
    console.log(i);
    document.querySelectorAll("a")[i].addEventListener("click", () => {
        num = i;
        ChangePic(num);
    })
}
// 左
document.querySelector(".left").addEventListener("click", () => {
        num--;
        if(num == -1) {
            num = 4;
        }
        console.log(num);
        ChangePic(num);
    })
    // 右
document.querySelector(".right").addEventListener("click", function() {
        num++;
        if(num == 5) {
            num = 0;
        }
        console.log(num);
        ChangePic(num);
    })
    //  鼠标移入移开
document.querySelector("div").addEventListener("mouseover", () => {
    clearInterval(timer);
})
document.querySelector("div").addEventListener("mouseout", () => {
    AddTimer(num);
})
AddTimer(num)是一个计时器,可以设定图片轮播间隔时间,实例里的轮播间隔时间是3s。
ChangePic(num)是切换图片函数,先把所有图片透明度设为0,再把当前轮播的图片透明度设为1。
toRed(num)是小横条颜色设置函数,先把所有小横条颜色设为grey,再把当前轮播的图片小横条颜色设为red。
总结
本文介绍了一个CSS+js实现的图片淡入淡出轮播效果的幻灯片实例,实例代码清晰易懂易修改,在很多网站都有使用。
您可能对以下文章也感兴趣
相关文章
x
- 站长推荐


